Sunday, March 22, 2009

Emu Bronte Or Stinger

GDI è una delle tante truffe online ?

GDI è una "truffa" ?


Ne ho le scatole talmente piene di leggere in giro questa domanda, che avrei quasi voglia di liquidarla con 4 parole semplici semplici: No, non lo è .

Penso infatti, che solo qualcuno che non la conosca direttamente possa farsi una domanda del genere. Personalmente non pensavo neanche che ci fosse stato bisogno di trattare l'argomento, nel mio blog su GDI. Ma svolgendo questa attività da qualche mese, mi è stato inevitabile leggere, su qualche newsgroup e alcuni forum, delle inesattezze sull'argomento, fino a sfociare a delle vere e proprie calunnie contro la Global Domains International e chi collabora con l'azienda come promotore.

Posso anche capire che i nostri connazionali abbiano il timore di fare acquisti su internet, dal momento che l'e-commerce è una realtà relativamente nuova nel panorama italiano. Ma da qui, a passare ad insulti pesanti contro chi ti propone un' opportunità Gain practical , .. It takes courage to sincerely ..

If you still do not know GDI Watch the video>> www.lavori-online.com

Saturday, March 21, 2009

Patty Cake Patty Cake Nursery Rhyme

Guadagnare online con GDI, è possibile ?

What is it and how does GDI


The year was 2000. Specifically we are in June 2000 when two visionary entrepreneurs in California and the prime minister of a small, unknown island off the Pacific Ocean, between Australia and South America (the Western Samoa ) forge a trade agreement that change from a few years ways to distribute internet domains to the general public. Thus was born the Global Domains Internationa , commonly abbreviated with the acronym GDI . The company, duly registered with the DSA (Direct Selling Association) pays its customers with monthly fees proportionate to the number of internet domains that are able to sell through them. For our American cousins, this type of marketing now has become as normal as going to buy milk from the shop downstairs, but we must recognize that we Italians, lately, even with our continued afraid to shop on the internet we are beginning a little to wake up to that effect.


What is gained by working with GDI


Considering the fact that the cost of the service is really ridiculous, I want to do about it but one example. Voglio tenermi basso e considerare un caso di pessimismo estremo.. ciascuno che iscriva una persona ogni 6 mesi a GDI:


  • Appena mi iscrivo sono da solo
  • Dopo 6 mesi iscrivo una persona, e siamo in 2
  • Dopo un anno, avremo iscritto un'altra persona a testa. Ora siamo in 4
  • Passano altri 6 mesi, adesso siamo 8
  • Alla fine del secondo anno diventeremo 16
  • Dopo due anni e 6 mesi dalla mia iscrizione mi ritrovo un gruppo di 32 persone (32 dollari al mese)
  • Saremo 64 alla fine del terzo anno (sto cominciando a guadagnare 64 dollari al mese)
  • Dopo 4 anni, se la matematica non è un'opinione.. guadagnerò 256 dollari
  • $ 512 per month per month is not me no one takes them off after four years and six months of my membership
  • the fifth year of operation can reach $ 1,024 per month

  • etc. .. Unlimited

Considering that to make the minimum pension must work virtually all his life, wait 5 years to make $ 1024 per month .. I really do not scare me! Of course this is a very pessimistic case, because in order to enter only one person every 6 months should just do nothing ..

If you want to try, I am offering a promotion in my website>> www.lavori-online.com

Thursday, March 5, 2009

How To Install Soap Dish

Tutorial loop video

Oggi facciamo un tutorialino semplice semplice per creare un loop video, cioè un video che finisce e ricomincia all'infinito, molto utile per sfondi, banner o applicazioni che non hanno limiti di tempo.
Con l'occasione useremo dei tasti rapidi di After Effects che ci aiutano a lavorare più velocemente.

N.B. Il tutorial descritto ha il solo scopo dimostrativo e non ha fini di lucro. L'utilizzo di questo materiale e di responsabilità del fruitore stesso.

Ecco il risultato:


1.

Apriamo AFX, File > Nuovo > Progetto.
Senza creare una nuova composizione, import the video "cielo.mov" in the folder and drag directly in the Composition panel. It will automatically generate a composition of the size and duration of the video.


2.

select the level cielo.mov and click on Layer> Time> Time Stretch, we set 50% in this way we make the video faster, then reduce the duration.


3.

bring the head to 1 second. If you like, click on the blue timecode, it opens the "Go to time."


OK.
add a marker at this level by pressing the asterisk "*".


4.

duplicate the layer: CTRL + D.
we go with the head 5 / 2 and selected Level 2, press "[", the level will automatically move to 5 seconds. (Sometimes the keys to run fast you must set the English keyboard).
Select both layers and press "T" will open the submenu Opacity. Activate the keyframe 100% for level 1 and 0% for level 2.
press "K" the head moves automatically insert markers hours per l'opacità 0% al livello 1 e 100% al livello 2. Abbiamo generato una dissolvenza incrociata tra i due livelli.


(con "J" e "K" spostiamo la testina tra i marker e i keyframe dei livelli, "J" indietro "K" avanti).


5.

Dunque tenendo la testina sul marker del livello 2, premere "N" che serve a delimitare la composizione in uscita. Andiamo con la testina sul marker del livello 1 a sinistra, premendo un paio di volte "J" e avanziamo di un solo frame per esempio premendo il tasto pagGiù.


(pagSu e pagGiu spostano la testina one frame at a time).
Now press "B" in determining the composition of the incoming. By pressing the right button on the white bar restraint is possible to "truncate the composition according to the work area." Pressing

RAM preview (zero key on the numeric keypad) and activating loop is already possible to see the video loop.

The project is loaded:

www.thisappear.com / download / tutorialloop.zip

have any questions comment.
Bye!

Tuesday, February 17, 2009

Facts About Instead Femine Protection

Tutorial titoli di testa

In this tutorial we will use the "Animate" the text layer to create headlines. Also see quickly how to rotate the virtual camera in 3D space in After Effects.

The video reference is this:


here is the link to download the project files:

www.thisappear.com / download / tutorialtitoli.zip

begin!

1.

New> Project, Composition> New Composition:


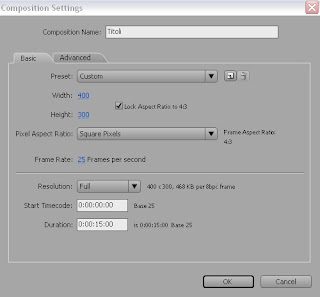
The background color of the composition must be black. Composition> Background Color ...


2.

We create a spot of red dietro la pistola: Livello> Nuovo > solido...
Clicchiamo su "grandezza composizione" e selezioniamo un colore rosso.


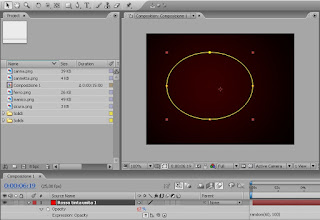
disegnamo poi una maschera circolare,più o meno, dove poi andremo a posizionare la pistola e la sfumiamo: maschera > sfumatura maschera = 295,295 circa.
Al solido ho poi applicato un piccolo codice sul livello opacità per farlo "vibrare": Animazione > AggiungiEspressione > scriviamo la stringa "random(60, 100)".

3.

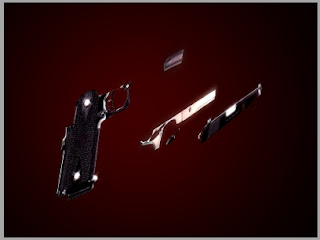
Preventivamente ho ritagliato in Photoshop la foto della Colt in varie parti, chiamando ogni file con un nome diverso. Importiamo tutte le png nello stage e attiviamo per ognuna il livello 3D:


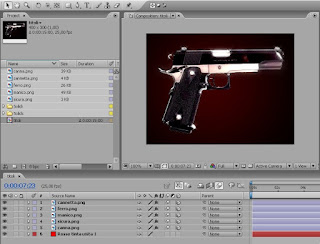
la pistola non è correttamente montata all'inizio. La dobbiamo rimontare noi ma in un modo "non convenzionale". Dobbiamo infatti sparpagliare i vari livelli sull'asse Z (senza ruotarli). Ovviamente i pezzi più lontani diventano più piccoli e quelli più vicini più grandi, riportiamoli alla stessa grandezza, a occhio, compensando con lo "scala". Una volta sistemate le grandezze di tutti i pezzi rimontiamo la pistola. Se il lavoro è fatto in modo accurato, avremo l'impressione che l'arma si tutta di un pezzo in realtà le componenti sono sfalzate in profondità.
Ecco una vista dall'alto:


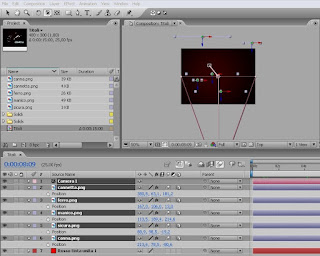
Non facciamo questo per masochismo, ci servirà per il movimento di camera.


4.

Andiamo a creare una nuova telecamera: Livello > nuova > telecamera. Usiamo il preset 50mm.


Bene. Ora mantenendo selezionato il livello camera, select the tool "Rotate Camera."


drag on stage with the left mouse button pressed, the camera rotates around its point of interest. You will see the gun, first mounted correctly, broken down into perspective.


It 'important to get a good navigation, that the point of interest is placed on the Z axis in the middle of the group of pieces of the gun.


5.

E 'can now enter the key frame animation to create the room.


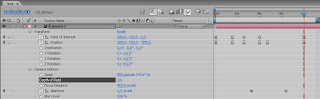
L'importante è che i due key frame (posizione e punto di interesse) della camera, alla fine dell'animazione, siano quelli iniziali; quelli di quando abbiamo creato la camera. Li possiamo riottenere premendo il tasto "Reset".
Alla pistola ho applicato un effetto bagliore e Starglow di Trapcode, che applica dei punti di luce sulle parti più chiare.


6.

Una volta fatta l'animazione di sfondo, andiamo ad integrare il testo.
Strumento Testo, scriviamo una parola, per esempio "diretto" colore azzurro chiaro. Per ora non è importante la posizione del testo. Clicchiamo sul sottomenu "Anima" > Character value.


submenu of the text layer is added to a "Animatore1", then at the end "character value."


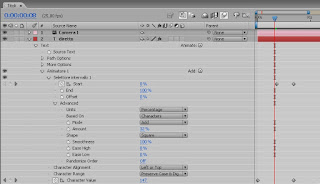
This feature allows After Effects to apply effects to just the parts of the text: one, two letters, any word or entire sentence. (You have already used in typing tutorial). In fact animating Start and End time to decide which parts of the text we want to apply the effect. Increasing Value
generic text that we have created a random code. Increasing the Amount value change the randomness of the code (makes it more varied). So
:
We assign a "Quantity" value 32%
animated character one second of time value from 100 to 400 for example.
0.5 to 1 second soul Start from 0 to 100.
looking at the animation we see that the text begins with a code mad, then letter after letter we had written back to the word "direct."


7.

effects inside the "soul" are added together, then add the Blur effect to create a motion blur. We select the text layer and again: Soul> Blur.


attention because selecting Instead, "switch range1" then Soul> Blur, the Blur will be affected by Animatore1 instead we want to create a new Animatore2. Start Animatore2
soul still 0.7 to 1 second from 0 to 100, while we only give the value of Blur Y: 7.
In this way we apply to the portion of text that is crazy code a vertical blur, as if they were moving fast.


8.

add more effect Transparency: Soul> Transparency.


animating effect with these parameters:

Adobe After Effects 8.0 Keyframe Data Units Per Second

25
Source Width 1
Source Height 1
Source Pixel Aspect Ratio 1
Comp Pixel Aspect Ratio 1

Text Animators Animator #3 Selectors Range Selector #1 Start #1
Frame percent
0 0
8 100
34 100
35 0
40 100

Text Animators Animator #3 Selectors Range Selector #1 End #2
Frame percent
34 100
35 0

Text Animators Animator #3 Selectors Range Selector #1 Offset #3
Frame percent
0

Text Animators Animator #3 Properties Opacity
Frame percent
0


End of Keyframe Data

the text will appear and disappear from left to right.


9.

Now you can duplicate the text layer, change the words to your liking and place them around in the video, the effects will be preserved. Even the text I applied two glow effect to give light.

Also this tutorial is not easy to follow without the project file.
Download it at the beginning of the paragraph.
If there is anything confusing comment, I will try to help.

Bye.