In this tutorial we will use the "Animate" the text layer to create headlines. Also see quickly how to rotate the virtual camera in 3D space in After Effects.
The video reference is this:
here is the link to download the project files:
www.thisappear.com / download / tutorialtitoli.zip
begin!
1.
New> Project, Composition> New Composition:
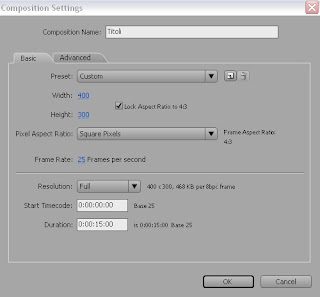
The background color of the composition must be black. Composition> Background Color ...
2.
We create a spot of red dietro la pistola: Livello> Nuovo > solido...
Clicchiamo su "grandezza composizione" e selezioniamo un colore rosso.
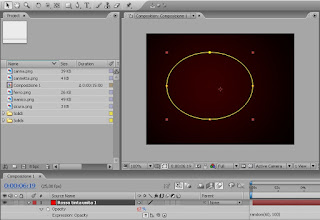
disegnamo poi una maschera circolare,più o meno, dove poi andremo a posizionare la pistola e la sfumiamo: maschera > sfumatura maschera = 295,295 circa.
Al solido ho poi applicato un piccolo codice sul livello opacità per farlo "vibrare": Animazione > AggiungiEspressione > scriviamo la stringa "random(60, 100)".
3.
Preventivamente ho ritagliato in Photoshop la foto della Colt in varie parti, chiamando ogni file con un nome diverso. Importiamo tutte le png nello stage e attiviamo per ognuna il livello 3D:
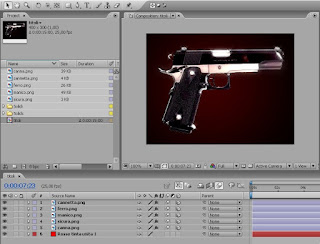
la pistola non è correttamente montata all'inizio. La dobbiamo rimontare noi ma in un modo "non convenzionale". Dobbiamo infatti sparpagliare i vari livelli sull'asse Z (senza ruotarli). Ovviamente i pezzi più lontani diventano più piccoli e quelli più vicini più grandi, riportiamoli alla stessa grandezza, a occhio, compensando con lo "scala". Una volta sistemate le grandezze di tutti i pezzi rimontiamo la pistola. Se il lavoro è fatto in modo accurato, avremo l'impressione che l'arma si tutta di un pezzo in realtà le componenti sono sfalzate in profondità.
Ecco una vista dall'alto:
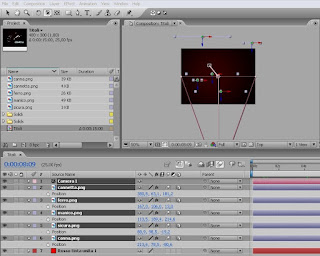
Non facciamo questo per masochismo, ci servirà per il movimento di camera.
4.
Andiamo a creare una nuova telecamera: Livello > nuova > telecamera. Usiamo il preset 50mm.
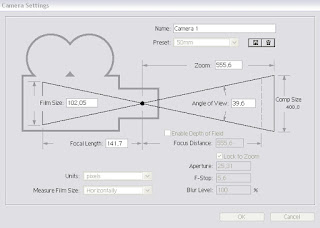
Bene. Ora mantenendo selezionato il livello camera, select the tool "Rotate Camera."

drag on stage with the left mouse button pressed, the camera rotates around its point of interest. You will see the gun, first mounted correctly, broken down into perspective.
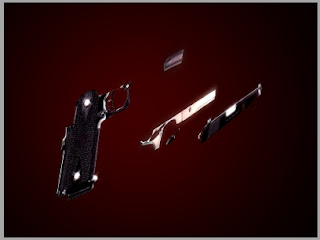
It 'important to get a good navigation, that the point of interest is placed on the Z axis in the middle of the group of pieces of the gun.
5.
E 'can now enter the key frame animation to create the room.

L'importante è che i due key frame (posizione e punto di interesse) della camera, alla fine dell'animazione, siano quelli iniziali; quelli di quando abbiamo creato la camera. Li possiamo riottenere premendo il tasto "Reset".
Alla pistola ho applicato un effetto bagliore e Starglow di Trapcode, che applica dei punti di luce sulle parti più chiare.
6.
Una volta fatta l'animazione di sfondo, andiamo ad integrare il testo.
Strumento Testo, scriviamo una parola, per esempio "diretto" colore azzurro chiaro. Per ora non è importante la posizione del testo. Clicchiamo sul sottomenu "Anima" > Character value.

submenu of the text layer is added to a "Animatore1", then at the end "character value."
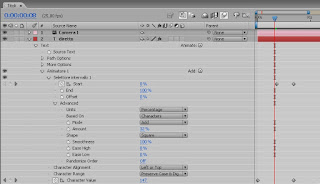
This feature allows After Effects to apply effects to just the parts of the text: one, two letters, any word or entire sentence. (You have already used in typing tutorial). In fact animating Start and End time to decide which parts of the text we want to apply the effect. Increasing Value
generic text that we have created a random code. Increasing the Amount value change the randomness of the code (makes it more varied). So
:
We assign a "Quantity" value 32%
animated character one second of time value from 100 to 400 for example.
0.5 to 1 second soul Start from 0 to 100.
looking at the animation we see that the text begins with a code mad, then letter after letter we had written back to the word "direct."
7.
effects inside the "soul" are added together, then add the Blur effect to create a motion blur. We select the text layer and again: Soul> Blur.

attention because selecting Instead, "switch range1" then Soul> Blur, the Blur will be affected by Animatore1 instead we want to create a new Animatore2. Start Animatore2
soul still 0.7 to 1 second from 0 to 100, while we only give the value of Blur Y: 7.
In this way we apply to the portion of text that is crazy code a vertical blur, as if they were moving fast.
8.
add more effect Transparency: Soul> Transparency.

animating effect with these parameters:
Adobe After Effects 8.0 Keyframe Data Units Per Second
25
Source Width 1
Source Height 1
Source Pixel Aspect Ratio 1
Comp Pixel Aspect Ratio 1
Text Animators Animator #3 Selectors Range Selector #1 Start #1
Frame percent
0 0
8 100
34 100
35 0
40 100
Text Animators Animator #3 Selectors Range Selector #1 End #2
Frame percent
34 100
35 0
Text Animators Animator #3 Selectors Range Selector #1 Offset #3
Frame percent
0
Text Animators Animator #3 Properties Opacity
Frame percent
0
End of Keyframe Data
the text will appear and disappear from left to right.
9.
Now you can duplicate the text layer, change the words to your liking and place them around in the video, the effects will be preserved. Even the text I applied two glow effect to give light.
Also this tutorial is not easy to follow without the project file.
Download it at the beginning of the paragraph.
If there is anything confusing comment, I will try to help.
Bye.